SDK Manual
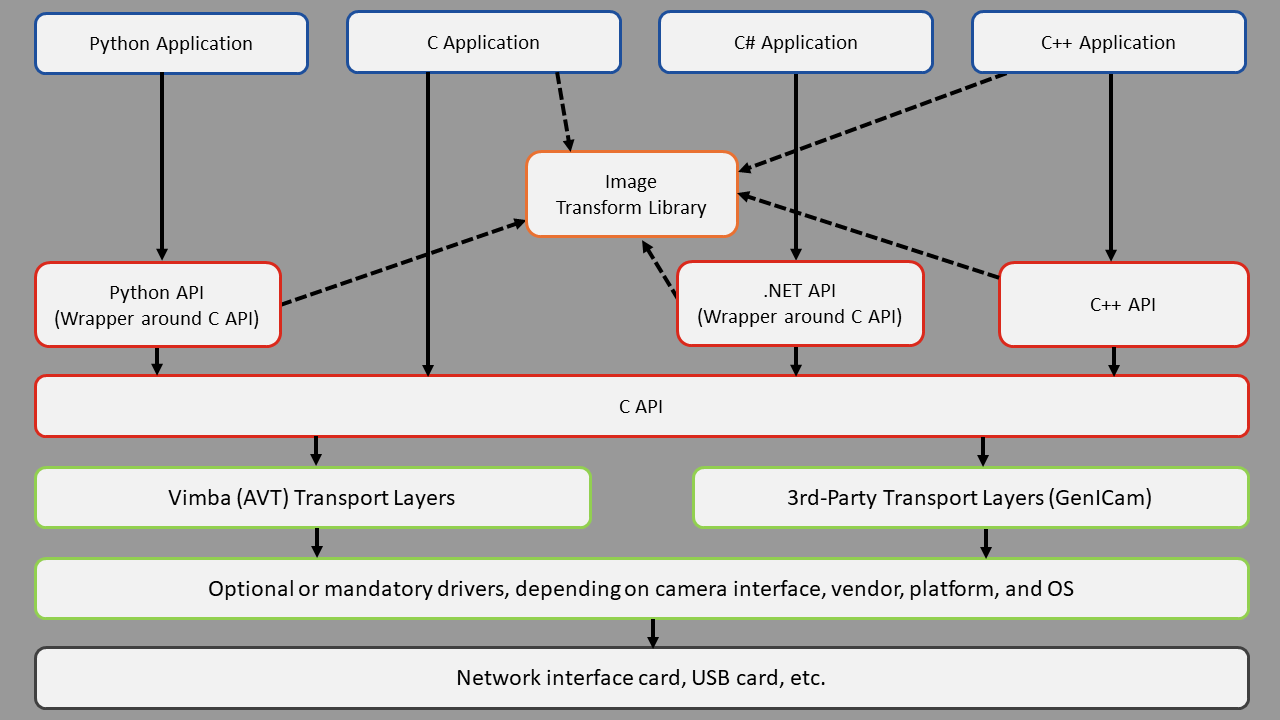
Architecture and APIs
All APIs cover the following functions:
Listing currently connected cameras
Controlling camera features
Receiving images from the camera
Notifications about camera connections or disconnections
The Image Transform Library converts camera images into other pixel formats and creates color images from raw images (debayering).
SDK architecture
GenTL modules
Vimba X complies with the GenTL specification. It uses the following GenTL modules as Entities:
The VmbSystem module, which is a singleton and contains only few functions.
The TLSystem modules. Each TL is represented through a System and may enumerate multiple corresponding interfaces, such as several NICs.
The Interface modules. Each physical interface (for example, a NIC or a frame grabber) is represented through its own Interface module. Each Interface module enumerates the devices (cameras) that are connected to it.
The Device module. According to the GenTL specification, the physical camera is a Remote Device, whereas the TL generates a Local Device as soon as a camera is open. The Local Device is necessary only to configure features such as GVCPTimeout or GevHeartbeatTimeout for GigE Cameras.
The Stream module.
The Buffer module. Buffer-related features can be accessed through the Frame handle.
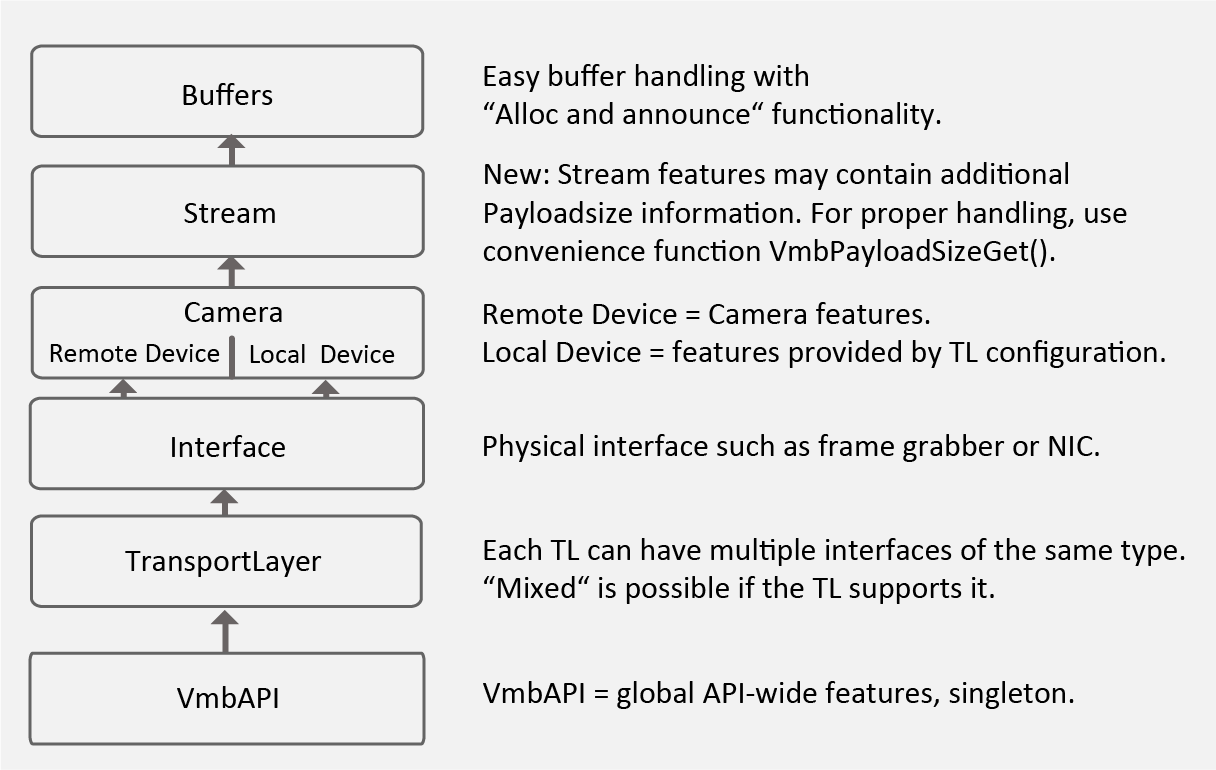
GenTL modules
Features
Within Vimba X, settings and options are controlled by features. Many features come from the camera, which provides a self-describing XML file. Vimba X can read and interpret the camera XML file. This means that Vimba X is immediately ready-to-use with all supported cameras. Even if the camera has a unique, vendor-specific feature, Vimba X does not need to be updated to use this feature because it gets all necessary information from the XML file. Other features are part of the Vimba X core and transport layers.
If these features are enabled for the TL, they are valid for all interfaces and cameras using this TL. If these features are enabled for the interface (such as a NIC), they are valid for all interfaces.
See also
For a quick start, use the ListFeatures example. More detailed information is provided in the API manuals.
Vimba X provides several feature types:
Integer
Float
Enum
String
Command
Boolean
Raw data
The features of Vimba X are based on the GenICam industry standard. Therefore, Vimba X enables using all supported cameras with GenICam-based third-party software.
TL activation and deactivation
The APIs use GenICam transport layer (GenTL) libraries to communicate with the cameras.
By default, each SDK initialization uses all transport layers that come with Vimba X, as applied in VmbC.xml. Their display name begins with “AVT” instead of “Vimba”.
Additionally, transport layers from the Allied Vision brands Allied Vision Gilching (USB), Allied Vision’s CoaxPress TL available in eGrabber, and Allied Vision Finning are loaded for usage with Vimba X (if installed). These transport layers do not come with Vimba X. For details, see chapter Vimba X Ecosystem.
You can customize TL usage to activate additional TLs or ignore TLs that you don’t need.
Note
If many TLs are installed, loading all of them takes some time.
Configuring TL usage
Note
Your changes of VmbC.xml will be deleted during the Vimba X deinstallation. We recommend saving a copy with your changes.
With VmbC.xml, you can configure which TLs are used by Vimba X. The file is located in he Vimba X install directory/bin. The comments in VmbC.xml describe how to configure TL usage with Vimba X.
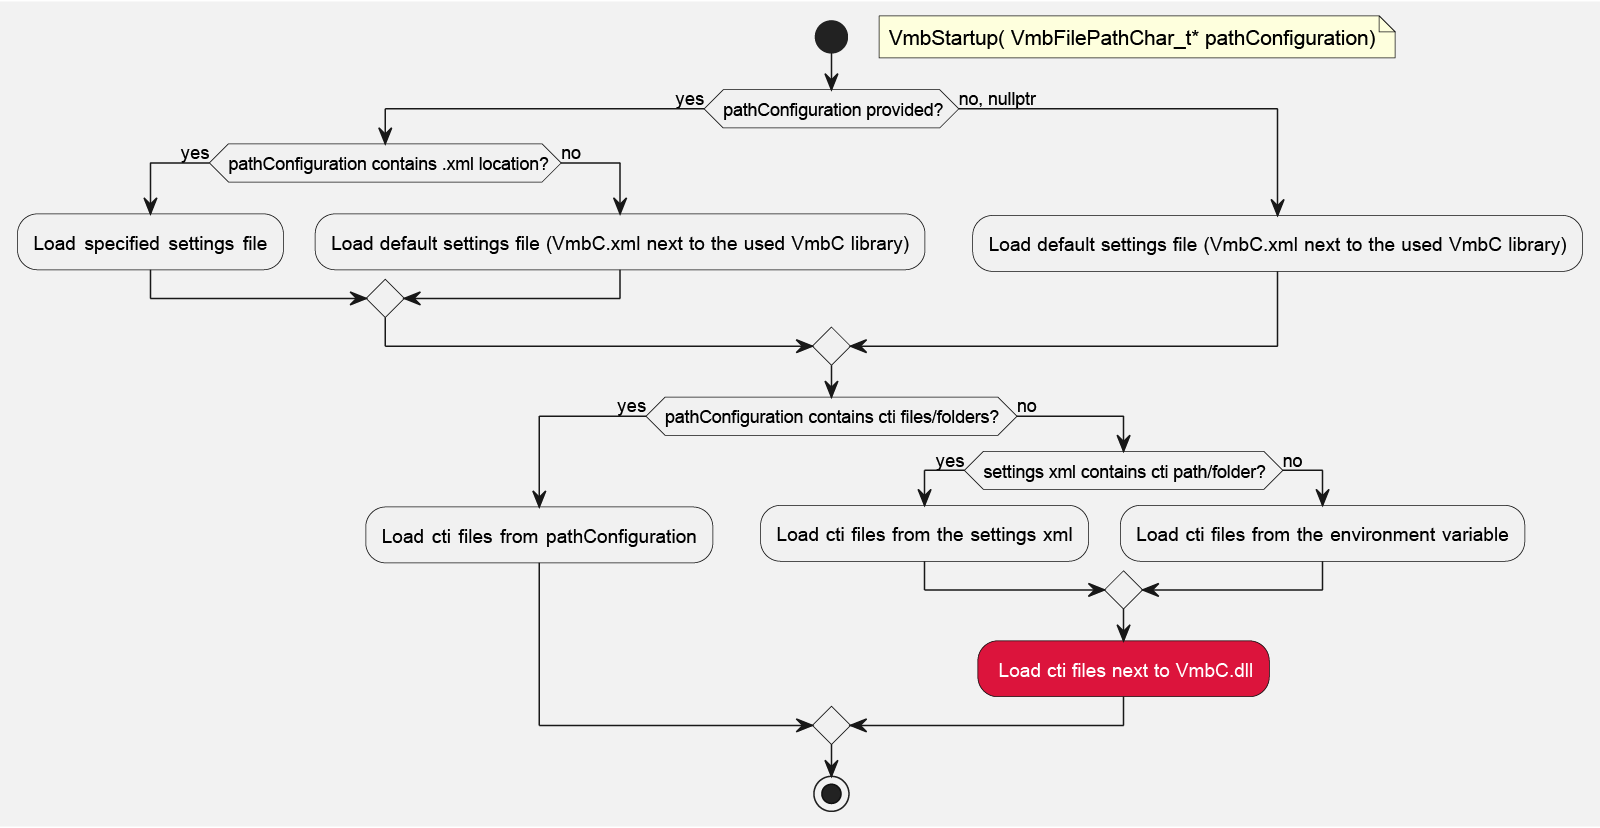
By default, VmbStartup loads cti files which are located next to VmbC.dll if no cti path is provided as input.
VmbC TL loading behavior
Overwriting VmbC.xml
During SDK initialization, the settings of VmbC.xml are applied. By default, the string for path configuration is NULL and all TLs activated in VmbC.xml are loaded.
To overwrite the TL path settings in VmbC.xml, pass a string to VmbStartup()
with the path to the TL directory or file you want to load.
int main()
{
    VmbError_t          err = VmbErrorSuccess;

        const VmbFilePathChar_t* usbTLFilePath = L"<path to VimbaUSBTL.cti>";
        const VmbFilePathChar_t* gigeTLDirectoryPath = L"<path to TL directory>";
        const VmbFilePathChar_t* multiplePaths = L"<path 1>";"<path 2>";

        err = VmbStartup(usbTLFilePath)
Synchronous and asynchronous image acquisition
This chapter explains the principles of synchronous and asynchronous image acquisition. For details, please read the API manual. Note that the API provides ready-made convenience functions for standard applications. These functions perform several procedures in just one step. However, for complex applications with special requirements, manual programming as described here is still required.
See also
For a quick start, see the AsynchronousGrab example.
Buffer management
Every image acquisition requires allocating memory and handling frame buffers. The following interaction between the user and the Vimba API is required:
Tip
C and C++ API: Stream features may contain additional payloadsize information. For proper handling, use the convenience function VmbPayloadSizeGet().
User:
Allocate memory for the frame buffers on the host PC.
Announce the buffer (this hands the frame buffer over to the API).
Queue a frame (prepare buffer to be filled).
Vimba:
Vimba X fills the buffer with an image from the camera.
Vimba X returns the filled buffer (and hands it over to the user).
User:
Work with the image.
Requeue the frame to hand it over to the API.
Synchronous image acquisition
Synchronous image acquisition is simple, but does not allow reaching high frame rates. Its principle is to handle only one frame buffer and the corresponding image at a time, which is comparable to juggling with one ball.
Asynchronous image acquisition
Asynchronous image acquisition is comparable to juggling with several balls: While you work with an image, the next image is being acquired. Simplified said: the more images within a given time you want to work with, the more buffers you have to handle.
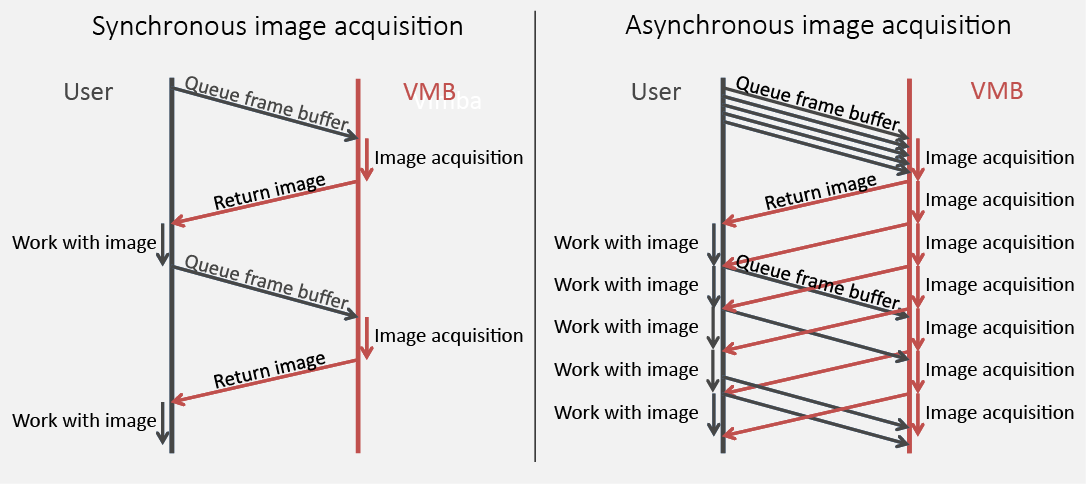
Synchronous and Asynchronous image acquisition
Notifications
In general, a vision system consisting of cameras and PCs is asynchronous, which means that certain events usually occur unexpectedly. This includes - among others - the detection of cameras connected to the PC or the reception of images. A Vimba X application can react on a particular event by registering a corresponding handler function at the API, which in return will be called when the event occurs. The exact method how to register an event handler depends on the programming language. For details, use the code examples.
Note
The registered functions are usually called from a different thread than the application. So extra care must be taken when accessing data shared between these threads (multithreading environment). Furthermore, the API might be blocked while the event handler is executed. Therefore, it is highly recommended to exit the event handler function as fast as possible.
Note
Not all API functions may be called from the event handler function. For more details, see the API Manual.
Building applications
Setting up Visual Studio for C and C++ projects
The easiest way to set up Visual Studio for C or C++ projects is using the property sheet VmbCPP.props from the Vimba X examples folder. The following description uses C++, but the principle can be applied to the C API as well. Users of the other APIs can use Visual Studio without any special preparations.
In Visual Studio, create a new project. Ignore the Application Wizard, just click Finish. Set the Solution Platform to x64.
Insert this code into YourProjectName.cpp:
#include <iostream>

#include "VmbCPP/VmbCPP.h"

int main()
{
    std::cout << "Hello Vimba X" << std::endl;
    VmbCPP::VmbSystem& sys = VmbCPP::VmbSystem::GetInstance();
    VmbVersionInfo_t version;
    if (VmbErrorSuccess == sys.QueryVersion(version ))
    {
    std::cout << "Version:" << version.major << "." << version.minor << std::endl;
    }
    getchar ();
    return 0;
}
Open the Property Manager window. In most Visual Studio editions, you can find it by clicking View → Other Windows → Property Manager.

In the Property Manager window, click the Add Existing Property Sheet icon:
Go to the VmbCPP Examples folder, see Examples Overview. The VmbCPP.props file is located in the folder Common\build_vs.
Now Visual Studio is set up and you can debug the solution.
Using CMake
You can also build the C and C++ examples with CMake. We recommend using CMake v3.16 or higher. As CMake generators, we have tested Visual Studio 2019 and Make.
# Windows, default generator: Visual Studio (default examples installation folder)
cmake -A x64 -S "C:/Users/Public/Documents/Allied Vision/VimbaX/Examples/VmbC" -
B VmbC_examples_build
cmake -A x64 -S "C:/Users/Public/Documents/Allied Vision/VimbaX/Examples/VmbCPP" -
B VmbCPP_examples_build

cmake --build VmbC_examples_build --config Release
cmake --build VmbCPP_examples_build --config Release
# Unix Makefiles
# Here, Vimba X is installed in the user's home directory and
# version is 2022-1
api_dir=$(realpath ~/VimbaX_2022-1/api)

cmake -S "${api-dir}/examples/VmbC" -B VmbC_examples_build
cmake -S "${api-dir}/examples/VmbCPP" -B VmbCPP_examples_build

cmake --build VmbC_examples_build
cmake --build VmbCPP_examples_build