.NET API Manual
Introduction to the API
VmbNET is a wrapper around the VmbC API. The VmbNET API provides the complete functionality of the VmbC API. For quick and easy development, VmbNET offers convenience methods and uses the dispose pattern.
Note
Note for Vimba users: VmbNET is a completely different API than VimbaNET. You cannot reuse C# code from Vimba. The new API supports compatibility with Windows and Unix-based operating systems.
See also
To understand the API, read the SDK Manual first: It contains essential information. For a quick start, use the examples, see Examples Overview.
The VmbNET API enables you to develop your application with very few lines of code:
using VmbNET;

class Program
{
    static void Main()
    {
        using var vmb = VmbSystem.Startup(); // API startup (loads transport layers)

        cam = vmb.GetCameras()[0]; // Get the first available camera

        using var openCam = cam.Open(); // Open the camera

        openCam.Features.ExposureTime = 5000.0; // Set the exposure time value

        // Register an event handler for incoming frames
        openCam.FrameReceived += (s,e) =>
        {
            using var frame = e.Frame;
            Console.WriteLine($"Frame Received! ID={frame.Id}");
        }; // IDisposable: Frame is automatically requeued

        // Convenience function to start acquisition
        using var acquisition = openCam.StartFrameAcquisition();

        Thread.Sleep(2000);

    } // IDisposable: Stops acquisition, closes camera, shuts down Vimba X
}
Read the following chapters for detailed explanations and to learn about more possibilites.
Compatibility
The VmbNET API is compatible with:
Windows64, Linux64, and Linux ARM
VmbNET API assembly is compliant with .NET standard 2.0
Runtimes:
.NET Core 2 or higher
.NET Framework 4.6.1 or higher
.NET and C# version for examples
The examples use .NET 8 and C# 9.0.
Visual Studio versions
If using .NET 8.0, it is recommended to use VS 2022. Otherwise, use VS 2019.
You can also use Visual Studio Code.
IDE for Linux
Visual Studio Code. Other IDEs may be possible but have not been tested.
VmbNET is available as a NuGet package. Note that the NuGet package doesn’t contain any transport layers, drivers, or tools. Therefore, always install the Vimba X SDK.
Install the NuGet package provided with Vimba X:
dotnet nuget add source <path to package>
Dispose patterns
The VmbNET API uses RAII, which is common for C++ applications, via the dispose pattern.
The dispose pattern enables the following:
The required resources are acquired when creating an instance of a disposable interface.
The resources are automatically released when the instance is no longer reachable.
IDisposable interface
VmbNET enables you to access the full functionality of Vimba X via interfaces. The concrete instances behind the interfaces are created by the API. You can use the interfaces directly upon retrieving them from the relevant method for resource acquisition (for example, opening the camera).
You can create multiple instances of a disposable interface acquiring the same resource. Reference counting ensures that acquisition and release only occur when the first instance is created and the last instance is disposed.
Chapter API usage contains commented code snippets where you can see how to
use the interfaces. You will mainly work with IOpenCamera, IFrame, and IFeature.
Features as dynamic types
Features as dynamic types:
Available features and their types of GenTL modules (see SDK Manual) are not known at compile time.
For easy access, VmbNET provides them as dynamic types.
Methods are called by the runtime when needed.
Features can be accessed like a property (for example, a desired feature’s name is known at compile time).
Features can be accessed by using their name as a dictionary key (for example, a desired feature’s name is not known at compile time).
Features behave like an instance of a type with properties / methods for feature operations.
Additional operations are provided, for example, command features can behave as methods, features with values can be set using the equality operator.
All features are available as dynamic objects, but can be treated as the underlying
static type (such as IFloatFeature). You can always convert a dynamic feature object
to its static type.
All modules that provide features are derived from the IFeatureContainer interface.
To aid development with camera features, a Visual Studio extension is provided (see chapter Chapter Visual Studio Extensions).
Note that VmbNET also provides Convenience methods.
Events
Events serve a multitude of purposes. They can have several origins such as
VmbSystem, IFeature, and IOpenCamera. You can register event handlers to receive events.
using System.Threading;
using System;
using VmbNET;

class Program
{
    static void Main()
    {
        using var vmbSystem = IVmbSystem.Startup();

        vmbSystem.CameraListChanged += (s, e) =>
        {
            Console.WriteLine($"Received event type {e.ListChangedEventType} for camera with ID {e.Camera.Id}");
        };

        Thread.Sleep(60000); // Receive events for 1 minute
    }
}
API diagram
The image below shows a VmbNET API UML diagram. To ease understanding the concept, only the most important items are listed.
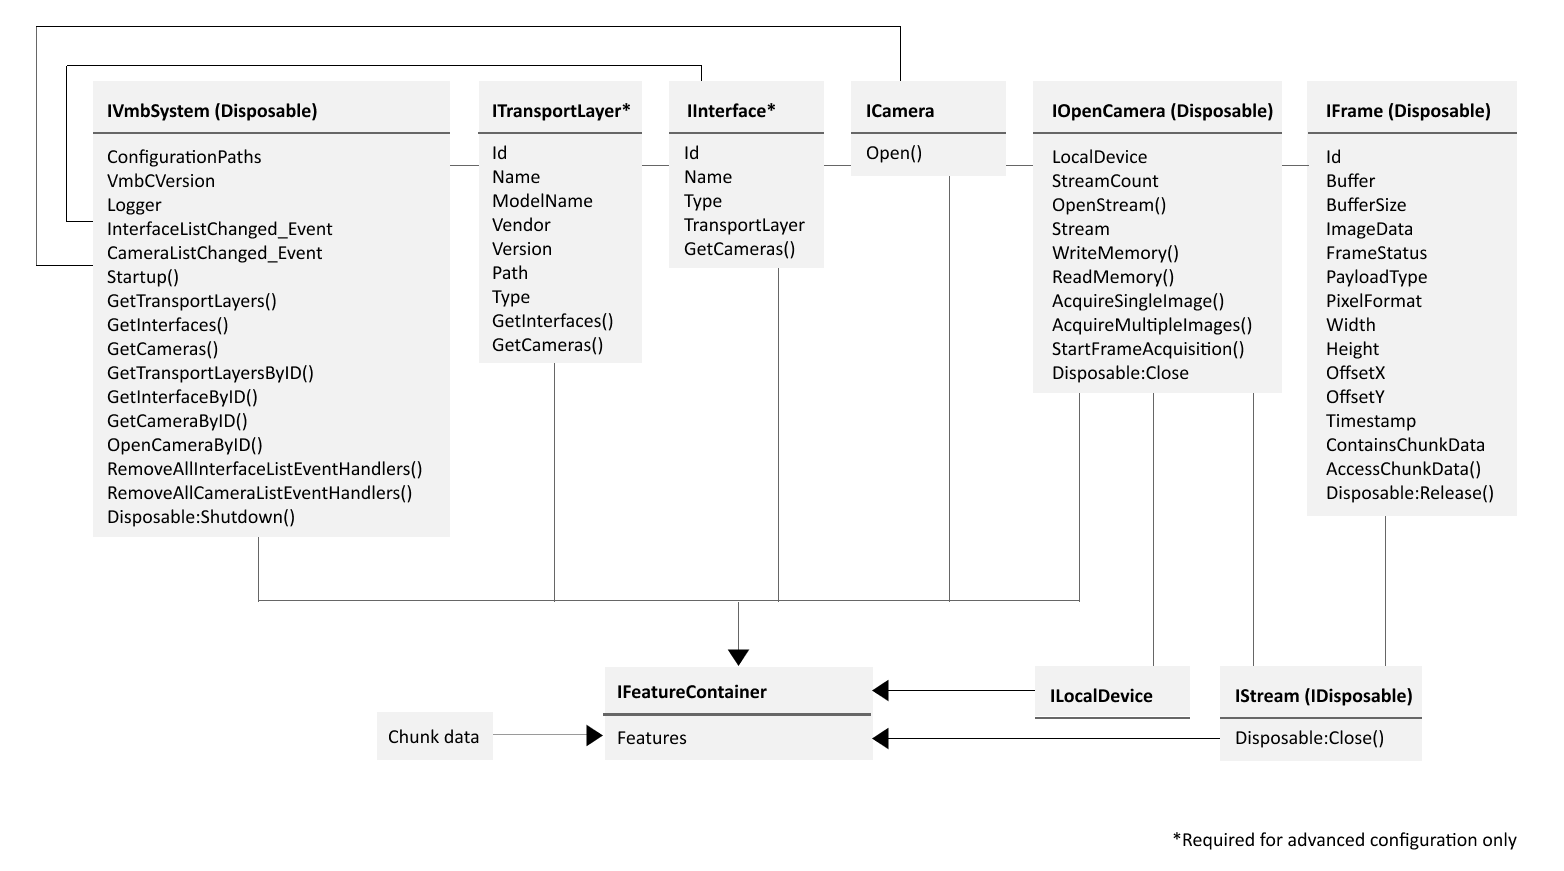
Simplified UML diagram
API usage
VmbNET examples
Building the examples with the command line
Make sure a .NET SDK is installed (we recommend .NET 8 SDK)
Make sure the VmbNET NuGet package (.nupkg file) is present on your system
Go to the VmbNET examples directory and see the README
// Building the VmbNET examples with the command line
dotnet build <ExampleName> --source "https://api.nuget.org/v3/index.json" --source <path-to-VmbNET-nupkg-file>
Visual Studio:
Open the properties of a solution and go to Application.
In the Target Framework drop-down list, select an installed .NET framework version.
Visual Studio Code:
Install the C# Dev Kit extension from Microsoft: https://marketplace.visualstudio.com/items?itemName=ms-dotnettools.csdevkit
Entry point
The entry point of VmbNET is the VmbSystem singleton. Creating an instance of IVmbSystem
starts up Vimba X.
using VmbNET;

class Program
{
    using IVmbSystem vmbSystem = IVmbSystem.Startup();
    ICamera camera = vmbSystem.GetCameras().First();

    // Open the camera to use features and to acquire images
    using (IOpenCamera openCamera = camera.Open())
    {
    // Use features and acquire images
    } // Closes the camera
} // Shuts down Vimba X
VmbC API version
Even if new features are introduced to the underlying VmbC API, your software remains backward compatible. You can check the version number of VmbC without initializing the VmbNET API:
using VmbNET;

class Program
{
    static void Main()
    {
        Console.WriteLine($"VmbC version: {IVmbSystem.VmbCVersion}");
    }
}
VmbNET version
The VmbNET version is the same as the assembly version, and is therefore specified in the NuGet package name.
It can also be extracted pogrammatically in the usual ways (for example, by calling typeof(IVmbSystem).Assembly.GetName().Version).
Listing cameras
Cameras are detected automatically during API startup. The order in which detected cameras are listed is determined by the order of camera discovery and therefore not deterministic. The discovery of GigE cameras may take several seconds. Before opening cameras, camera objects contain all static details of a physical camera that do not change throughout the object’s lifetime such as the camera ID and the camera model.
See also
see the ListCameras.cs example.
using System;
using VmbNET;

class Program
{
     static void Main()
     {
         using var vmbSystem = IVmbSystem.Startup();

         var cameras = vmbSystem.GetCameras();

         if(cameras.Count > 0)
         {
             Console.WriteLine($"Found {cameras.Count} cameras");
         }
         else
         {
             Console.WriteLine($"Found no cameras");
         }
     }
}
Listing features
See also
To list all features of a camera and its physical interface, see the ListFeatures.cs example.
using System.Linq;
using System;
using VmbNET;

class Program
{
    static void Main()
    {
        using var vmbSystem = IVmbSystem.Startup();

        var camera = vmbSystem.GetCameras().First();

        Console.WriteLine($"Using camera with ID {camera.Id}");

        using var openCamera = camera.Open();

        Console.WriteLine($"Camera has {openCamera.Features.Count} features");

        foreach (var feature in openCamera.Features)
        {
            Console.WriteLine($"Camera has feature {feature.Name}");
        }
    }
}
Opening a camera
The ICamera.Open() method opens the camera and returns an instance of a disposable IOpenCamera,
which can be used to access the features of the camera and its local device, as well as acquire frames.
On disposal the camera is implicitly closed.
using VmbNET;

class Program
{
    static void Main()
    {
        using IVmbSystem vmbSystem = IVmbSystem.Startup();
        ICamera camera = vmbSystem.GetCameras().First();

        // Open the camera to use features and to acquire images
        using (IOpenCamera openCamera = camera.Open())
        {
        // Use features and acquire images
        // Leaving the scope closes the camera
        }
    } // Shuts down Vimba X
}
Accessing features
.NET’s Dynamic Language Runtime (DLR) resolves underlying feature types at runtime. To set a feature value, you only need a single line of code:
// Set an exposure time value
openCamera.Features.ExposureTime = 5000.0;

// Increase the exposure time by a certain amount
openCamera.Features.ExposureTime += 100.0;
For more complex use cases, you can use the underlying static type:
// Use the underlying static type
IFloatFeature exposureTimeFeature = openCamera.Features.ExposureTime;
exposureTimeFeature.Value = 5000.0;
exposureTimeFeature.Value += 100.0;
The following code snippet sums it up:
using System.Linq;
using VmbNET;

class Program
{
    static void Main()
    {
        // Start Vimba X
        using var vmbSystem = IVmbSystem.Startup();

        // Get first camera in camera list
        var camera = vmbSystem.GetCameras().First();

        // Open this camera
        using var openCamera = camera.Open();

        // Change exposure time
        openCamera.Features.ExposureTime = 5000.0;

        // Increase exposure time
        openCamera.Features.ExposureTime += 100.0;

        // Convert exposure time dynamic instance to static type
        IFloatFeature exposureTimeFeature = openCamera.Features.ExposureTime;

        // Increase exposure time again
        exposureTimeFeature.Value += 200.0;
    }
}
If an application accesses cameras with and without a given feature,
use the Exists property:
// Print the mainboard temperature to the console if the device provides the corresponding feature, otherwise print nothing

if(openCamera.Features.DeviceTemperatureSelector.Exists &&
(bool)openCamera.Features.DeviceTemperatureSelector.EnumEntriesByName.ContainsKey("Mainboard"))
{
    openCamera.Features.DeviceTemperatureSelector = "Mainboard";
    double mainboardTemperature = openCamera.Features.DeviceTemperature;
    Console.WriteLine($"The temperature of this device's mainboard temperature is {mainboardTemperature} degrees C");
}
If a feature’s name is not known at compile time (for example, it is read from a configuration file at run time), it can be accessed from the Features
property using the name as a key:
string featureName = GetFeatureNameFromFile();
var feature = openCamera.Features[featureName];
Command feature execution
Commands are executed by calling their Run() method, and then checking whether the command
completed successfully via the IsDone property:
openCamera.Features.UserSetSelector = "UserSet2";
ICommandFeature userSetSaveFeature = openCamera.Features.UserSetSave;
userSetSaveFeature.Run();
// Do some operations that don't depend on UserSetSave command completing
if(!userSetSaveFeature.IsDone)
{
    Console.WriteLine("UserSetSave command not yet completed");
}
Alternatively, the completion of a command can be asynchronously awaited, with a timeout after which an exception is thrown if the command did not complete:
try
{
    var task = userSetSaveFeature.Run(TimeSpan.FromSeconds(2.0));
    // Do some operations that don't depend on UserSetSave command completing
    await task; // Wait for UserSetSave command to complete if not already completed
}
catch(VmbTimeoutException)
{
    Console.WriteLine("UserSetSave command not yet completed");
}
When executing a command feature as a dynamic feature,
the Run() method can be replaced by an invocation of the feature
itself as if it was a method:
openCamera.Features.AcquisitionStart();
Acquiring images
Convenience methods
The VmbNET API provides the following convenience methods for image acquisition:
StartFrameAcquisition()AcquireSingleImage()AcquireMultipleImages()
For a description and code snippets, see below.
See also
The SDK Manual, section Synchronous and asynchronous image acquisition, provides background knowledge. The C API Manual, section Image Capture vs. Image Acquisition, provides detailed information about functions of the underlying C API.
Asynchronous Acquisition
The convenience methods StartFrameAcquisition()
and StartFrameAcquisition(AllocationModeValue allocationMode, UInt32 bufferCount)
perform all steps for
acquiring frames asynchronously. This is done via an event handler
registered to the FrameReceived event of an instance of IOpenCamera.
They return an instance of the disposable IAcquisition, which reverses these steps.
If the parameterless version of this method is used,
the API allocates the frame buffers (AllocationModeValue.AnnounceFrame) and 5 frame buffers are allocated.
openCamera.FrameReceived += (s, e) =>
                            {
                                using var frame = e.Frame;
                                // Do something with frame
                            };
using IAcquisition acquisition = openCamera.StartFrameAcquisition();

// Do something while acquiring
Disposable asynchronous acquisition:
In the following code snippet, frames are acquired asynchronously from the camera’s first stream, using 5 frame buffers allocated by the transport layer.
using var stream = openCamera.OpenStream(0);

stream.FrameReceived += (s, e) =>
                        {
                            using var frame = e.Frame;
                            // Do something with frame
                        };

using var streamCapture = stream.PrepareCapture(AllocationModeValue.AllocAndAnnounceFrame, 5);

openCamera.Features.AcquisitionStart();
// Do something while acquiring frames
openCamera.Features.AcquisitionStop();
See also
The SDK Manual, section Synchronous and asynchronous image acquisition, provides background knowledge. The C API Manual, section Image Capture vs. Image Acquisition, provides detailed information about functions of the underlying C API.
Synchronous Acquisition
A single frame can be acquired synchronously with the convenience methods
AcquireSingleImage(TimeSpan timeout) and
AcquireSingleImage(AllocationModeValue allocationMode, TimeSpan timeout).
If the version without the allocationMode parameter is used, frame buffers are allocated by the API (AllocationModeValue.AnnounceFrame).
using (IFrame frame = openCamera.AcquireSingleImage(TimeSpan.FromMilliseconds(500.0)))
{
   // Do something with frame
}  // IFrame.Dispose() deallocates its buffer
Multiple frames can be acquired synchronously with the convenience methods
AcquireMultipleImages(UInt32 frameCount, AllocationModeValue allocationMode, TimeSpan timeout)
and AcquireMultipleImages(UInt32 frameCount, TimeSpan timeout).
If the version without the allocationMode parameter is used, frame buffers are allocated by the API (AllocationModeValue.AnnounceFrame).
using (IFrameList frameList = openCamera.AcquireMultipleImages(5,
                                                               TimeSpan.FromMilliseconds(500.0)))
{
   // Do something with the 5 frames in frameList
}  // IFrameList.Dispose() calls each IFrame.Dispose(), which deallocates its buffer
Disposable synchronous acquisition:
Synchronous acquisition occurs if no event handlers are registered to
IOpenCamera.FrameReceived. In this case, the frames are retrieved
from IStreamCapture.WaitForFrame(). This method blocks until
a frame has been filled.
using IStream stream = openCamera.Stream;
using IStreamCapture preparedStream = stream.PrepareCapture(AllocationModeValue.AnnounceFrame, 10);
openCamera.Features.AcquisitionStart();
for(int i = 0; i < 10; ++i)
{
     using IFrame frame = preparedStream.WaitForFrame(TimeSpan.FromMilliseconds(500));
    // Do something with frame
}
openCamera.Features.AcquisitionStop();
Third-party frame buffers
The IFrameBufferPool interface allows you to pass a pool of
externally allocated frame buffers (such as third-party ones) to Vimba X
for filling with frame data. This interface is simply a list
of buffer addresses and sizes, which is read-only and disposable.
A reference implementation is provided by FrameBufferPool.
The frame buffer pool is passed to the underlying VmbC API via an overloaded PrepareCapture method of IStreamCapture.
Similarly, a frame buffer pool is passed for filling with converted frame data to
VmbTransform via an overloaded Create method of IFrameConverter.
Getting and setting pixel formats
Pixel formats of a camera are accessed via the PixelFormat string feature:
openCamera.Features.PixelFormat = "RGB8";
The pixel format of a frame is obtained via its PixelFormat property of type IFrame.PixelFormatValue:
IFrame.PixelFormatValue framePixelFormat = frame.PixelFormat;
Converting a pixel format
With the FrameConverter VmbNET module, you can access the Image Transform Manual
Image Transform library.
The methods IsPixelFormatConversionSupported(string pixelFormatString, string conversionPixelFormatString)
and IsPixelFormatConversionSupported(IFrame.PixelFormatValue pixelFormat, IFrame.PixelFormatValue conversionPixelFormat)
allow to determine whether a given pixel format conversion is supported.
All possible conversions of a given pixel format can be obtained from
GetSupportedPixelFormatConversions(pixelFormat).
using IFrame frame = preparedStream.WaitForFrame(TimeSpan.FromMilliseconds(500.0));
var conversionPixelFormat = IFrame.PixelFormatValue.RGB8;
// Create frame converter for converting frames to RGB8
using IFrameConverter frameConverter = IFrameConverter.Create(conversionPixelFormat);
if(IFrameConverter.IsPixelFormatConversionSupported(frame.PixelFormat, conversionPixelFormat))
{
    IFrame convertedFrame = frameConverter.Convert(frame); // Convert to RGB8
    // Do something with converted frame
}
using IFrame frame = preparedStream.WaitForFrame(TimeSpan.FromMilliseconds(500.0));
using IFrameConverter frameConverter = IFrameConverter.Create("RGB8");
float[,] transformParamerMatrix = GetSomeTransformParameterMatrix();
IFrame convertedFrame = frameConverter.SetDebayerMode(DebayerModeValue.Filter3x3)
                                      .SetColorCorrectionMatrix3x3(transformParamerMatrix)
                                      .Convert(frame);
Frame deinterlacing with unpacked mono formats: Use SetDeinterlacingPixelPattern(UInt32[2, 2] frameIndexPattern)
to set the pixel pattern, then Convert(IFrame frame, UInt32 deinterlacedFrameIndex) to extract the deinterlaced frame with the desired index.
Frame indices may appear more than once (averaged pixel values), but must be contiguous starting at 0.
using IFrame frame = preparedStream.WaitForFrame(TimeSpan.FromMilliseconds(500.0)); // assume an interlaced Mono12 frame is received
using IFrameConverter frameConverter = IFrameConverter.Create("Mono12");
IFrame convertedFrame = frameConverter.SetDeinterlacingPixelPattern(new UInt32[2, 2]{{2, 0}, {3, 1}})
                                      // call other desired "Set" methods here
                                      .Convert(frame, 3); // get the deinterlaced frame with index 3 as specified in the pixel pattern above
Disposing the IFrameConverter instance deallocates all buffers.
Disposing the instance of IFrame returned by IFrameConverter frees the IFrameConverter.
You don’t have to do this manually.
The IFrameConverter instance should not be disposed when the user supplies an instance of
their own implementation of IFrameBufferPool using one of the Create methods such as Create(IFrame.PixelFormatValue conversionPixelFormat, IFrameBufferPool frameBufferPool).
because in this case the IFrameBufferPool instance itself should rather be disposed.
Listing chunk data
Chunk data are image metadata such as the exposure time that are
available in the Frame. To activate chunk, see the user
documentation of your camera.
See also
The ChunkData.cs example shows in detail how to list chunk data such as the frame count or feature values such as the exposure time. See List Chunk data.
openCamera.Features.ChunkModeActive = false; // Deactivate chunk mode before enabling chunk selections
openCamera.Features.ChunkSelector = "ExposureTime";
openCamera.Features.ChunkEnable = true;
openCamera.Features.ChunkModeActive = true; // Reactivate chunk mode
openCamera.FrameReceived += (s, e) =>
{
     using var frame = e.Frame;
     frame.AccessChunkData(featureContainer => Console.WriteLine($"Frame's exposure time: {featureContainer.Features.ChunkExposureTime}"));
};
Loading and saving settings
Additionally to the user sets stored in the camera, you can save the feature values as an XML file to your
host PC. For example, you can configure your camera with Vimba X Viewer, save the settings, and load
them with any Vimba X API. Modules whose feature values can be saved and loaded are derived from the interface IPersistableFeatureContainer.
FeaturePersistSettings featurePersistSettings = new()
{
    LogLevel = FeaturePersistSettings.LogLevelValue.Trace,
    MaximumIterations = 2,
    Modules = FeaturePersistSettings.ModuleValues.Camera | FeaturePersistSettings.ModuleValues.TransportLayer,
    Type = FeaturePersistSettings.TypeValue.NoLUT
};
openCamera.SaveSettings("temp.xml", featurePersistSettings);
openCamera.LoadSettings("temp.xml", featurePersistSettings);
Triggering
Software trigger
Software trigger commands are supported by all Allied Vision cameras. To get started with triggering and explore the possibilities, you can use Vimba X Viewer. To program a software trigger application, use the following code snippet.
openCamera.FrameReceived += (s, e) =>
                            {
                                using var frame = e.Frame;
                                Console.WriteLine("Frame acquired");
                            };
openCamera.TriggerSource = "Software";
openCamera.TriggerSelector = "FrameStart";
openCamera.TriggerMode = "On";
using (IAcquisition acquisition = openCamera.StartFrameAcquisition())
{
    Thread.Sleep(TimeSpan.FromSeconds(1.0));
    openCamera.Features.TriggerSoftware();
    Thread.Sleep(TimeSpan.FromSeconds(1.0));
    openCamera.Features.TriggerSoftware();
    Thread.Sleep(TimeSpan.FromSeconds(1.0));
    openCamera.Features.TriggerSoftware();
}
Trigger over Ethernet - Action Commands
You can broadcast a trigger signal simultaneously to multiple GigE cameras via GigE cable. Action Commands must be set first to the camera(s) and then to the API, which sends the Action Commands to the camera(s).
See also
Find more details in the application note: Trigger over Ethernet (ToE) - Action Commands
Advanced API usage
Using the API without the dispose pattern
We recommend using the dispose pattern to avoid errors. If this is not desired, explicit methods are provided for releasing resources.
Alternatively to the dispose pattern, each disposable interface also provides the
Close() method. You can use it to
explicitly and unconditionally release a resource, for example:
openCamera.Close()stream.Close()
Note
Using such methods together with the dispose pattern is not supported.
Manual closing via the IOpenCamera.Close() method:
IOpenCamera openCamera = camera.Open();

// Do something with open camera

openCamera.Close();
Manual acquisition
Manual asynchronous acquisition from an initially unopened stream:
IStream stream = openCamera.Stream; // Open the first stream
stream.FrameReceived += (s, e) =>
                        {
                            IFrame frame = e.Frame;

                            // Do something with frame

                            // Requeue the instance of IFrame internally
                            frame.Release();
                        };
IStreamCapture preparedStream = stream.PrepareCapture(AllocationModeValue.AnnounceFrame, 10);
openCamera.Features.AcquisitionStart();

// Do something while acquiring (FrameReceived events can fire)

openCamera.Features.AcquisitionStop();

// Reverse all steps involved in preparing a stream
preparedStream.TearDown();

// Remove the registered event handler lambda function
stream.RemoveAllFrameEventHandlers();

// Close the stream
stream.Close();
Manual synchronous acquisition
If you don’t use the dispose pattern for manual synchronous acquisition, use the following methods for cleanup:
IFrame.Release()IStreamCapture.TearDown()IStream.Close()
IStream stream = openCamera.Stream;
IStreamCapture preparedStream = stream.PrepareCapture(AllocationModeValue.AnnounceFrame, 10);
openCamera.Features.AcquisitionStart();
for(int i = 0; i < 10; ++i)
{
   IFrame frame = preparedStream.WaitForFrame(TimeSpan.FromMilliseconds(500));
   // Do something with frame
   frame.Release();
}
openCamera.Features.AcquisitionStop();
preparedStream.TearDown();
stream.Close();
Manual shutdown
IVmbSystem.Shutdown() causes:
Interface and TL disposal, including Event Handlers
Camera disposal, including Event Handlers
Multithreading
The VmbNET API is thread-safe. Note that multithreading must be organized by the user. Be aware that some methods take some time.
Logging
Internal logging from the Vimba X .NET API for bug reporting and other purposes can be configured and activated
by providing an instance of an implementation of the
Microsoft.Extensions.Logging.Logger interface to the static method IVmbSystem.Logger.
For details, see the examples.
Logging levels
The logging levels used by the Vimba X .NET API are Error, Debug and Information.
Troubleshooting
Whenever VmbNET encounters problems it throws an exception of type VmbNETException
with an error message explaining the problem.
If the error occurred in VmbC, the exception is one of the more specific types
VmbException<TSourceError> and also contains the VmbC error code.
The generic parameter TSourceError is an empty type that indicates the source of the problem,
such as CameraError, FeatureError etc.
Visual Studio Extensions
Feature Completion
The Feature Completion extension for Visual Studio 2022 provides facilities similar to Visual Studio’s Intellisense to allow for easier, faster and reliable development with camera features. It can be installed by double-clicking the file FeatureCompletion.vsix, located in the same directory as the VmbNET NuGet package, and following the instructions in the VSIX installer.
Since a camera’s features are handled by dynamic types in VmbNET
to account for the fact that they are not known until runtime,
Intellisense will not provide completion items
when typing .Features. directly after an IOpenCamera instance in the VS editor.
However, the Feature Completion extension produces
a drop-down list containing all the feature names in version 2.7 of the GenICam
Standard Feature Naming Convention (SFNC).
Highlighting a feature name produces a pop-up describing the details of the feature,
and selecting a feature name (i.e. pressing the tab key or clicking the left mouse button)
enters it into the editor.
The extension also provides completion items for each type member following .Features.,
similar to Intellisense. For example, typing .Features.BinningSelector.EnumEntry. produces
a drop-down list containing all the properties belonging to the IEnumEntry interface.