SDK Manual
SDK overview
APIs and architecture
Vimba provides APIs for C, C++, .NET (Windows only), and Python. All APIs cover the following functions:
Listing currently connected cameras
Controlling camera features
Receiving images from the camera
Notifications about camera connections or disconnections
All APIs are based on the C API and use GenICam transport layer (GenTL) libraries to communicate with the cameras.
The Image Transform Library converts camera images into other pixel formats and creates color images from raw images (debayering). While this is separated for the C and C++ API, the .NET API includes these functions. Therefore, a .NET application doesn`t access the Image Transform Library.
The APIs use GenICam transport layer (GenTL) libraries to communicate with the cameras. These libraries can not be accessed directly through Vimba.

SDK architecture (Linux)
The best API for your purpose
Vimba provides four APIs:
The Python API is ideal for quick prototyping. We also recommend this API for an easy start with machine vision or embedded vision applications. For best performance and deterministic behavior, the C and C++ APIs are a better choice.
The C API is easy-to-use, but requires more lines of code than the Python API. It can also be used as API for C++ applications. The C API is also recommended to easily migrate from PvAPI to Vimba.
The C++ API is designed as a highly efficient and sophisticated API for advanced object-oriented programming including shared pointers, the STL (Standard Template Library), and interface classes. If you prefer an API with less design patterns, we recommend the Vimba C API.
The .NET API supports all .NET languages, for example, C#, C++/CLI, or Visual Basic .NET. Its general concept is similar to the C++ API.
API Entities
This chapter provides a rough overview of Vimba’s entities to explain their basic principles. The exact functionalities depend on the programming language.

Vimba API entities
All Vimba APIs use the same basic model for providing access to its entities. For object-oriented programming languages, this model is reflected in the class design, but even the C API supports this model by using handles as a representation of the different entities. The Python API uses with statements to access and handle the entities.
Vimba API entities:
The System entity represents the API itself. Therefore, only one instance of it is available. The application has to initialize the System entity before any other function can be used. When the application has finished using the API, it shuts it down through the System entity. The System entity holds a list of interfaces and cameras internally and serves as the main access point to these entities.
A Camera entity controls a physical camera and receives images from the camera. Its functions are independent of the underlying interface technology.
An Interface entity represents a port on a physical interface card in the PC. Configuring the interface card is the main purpose of the Interface entity. The camera can directly be accessed via the System entity.
Frames contain image meta-data as well as references to the data that were sent by the camera (image and ancillary data). For use in Vimba, they must be created by the application and then be queued at the corresponding camera. When an image was received, the next available frame is filled and handed over to the application through a dedicated notification. After having processed the image data, the application should return the frame to the API by re-enqueuing it at the corresponding camera.
These Vimba entities can be controlled and set up via features:
The System Features contain information about API-wide settings, for example, which transport layer has been loaded.
The Camera Features configure camera settings such as the exposure time or the pixel format.
Interface Features represent the settings of a physical interface card in the PC, for example, the IP address of a network interface card.
Frames wrap image data and, if enabled, AncillaryData (e.g., camera settings at the time of acquisition), which may also be queried via feature access.
Features in Vimba
Within Vimba, settings and options are controlled by features. Many features come from the camera, which provides a self-describing XML file (for 1394 cameras, the XML file is created by the Vimba 1394 TL according to the camera register entries). Vimba can read and interpret the camera XML file. This means that Vimba is immediately ready-to-use with any Allied Vision camera. Even if the camera has a unique, vendor-specific feature, Vimba does not need to be updated to use this feature because it gets all necessary information from the XML file. Other features are part of Vimba’s core and transport layers.
Vimba provides several feature types:
Integer
Float
Enum
String
Command
Boolean
Raw data
Vimba’s transport layers
A transport layer (TL) transports the data from the camera to an application on the PC. Vimba contains GenICam transport layers for all supported camera interfaces:
The Vimba GigE TL optionally uses the Vimba filter driver for Windows, which provides a high performance with less CPU load. The Vimba filter driver is available for Windows. It is compatible with all Allied Vision GigE cameras.
The Vimba USB TL uses the mandatory Vimba USB device driver for Windows or the driver of the Linux OS. It is compatible with all Allied Vision USB cameras.
The Vimba CSI TL (supported ARM boards only) uses the mandatory driver for Allied Vision MIPI cameras.
The Vimba 1394 TL (Windows only) uses the mandatory high-performance intek driver, which replaces the low-performance Microsoft driver (32-bit and 64-bit).
The Vimba Camera Link Config TL (Windows only) provides a Clallserial.dll, which connects with the Clserxxx.dll of GenICam-compliant frame grabbers.
Since Vimba’s transport layers support GenICam, Allied Vision cameras can easily be used with a GenICam-compliant third-party software.
Synchronous and asynchronous image acquisition
This section explains the principles of synchronous and asynchronous image acquisition. For details, please refer to the API manuals.
Note that the C++ API and the .NET API provide ready-made convenience functions for standard applications. These functions perform several procedures in just one step. However, for complex applications with special requirements, manual programming as described here is still required. The Python API handles many procedures within with statements.
Buffer management
Every image acquisition requires allocating memory and handling frame buffers. Except for the Python API, the following interaction between the user and the Vimba API is required:
User:
Allocate memory for the frame buffers on the host PC.
Announce the buffer (this hands the frame buffer over to the API).
Queue a frame (prepare buffer to be filled).
Vimba:
Vimba fills the buffer with an image from the camera.
Vimba returns the filled buffer (and hands it over to the user).
User:
Work with the image.
Requeue the frame to hand it over to the API.
Synchronous image acquisition
Synchronous image acquisition is simple, but does not allow reaching high frame rates. Its principle is to handle only one frame buffer and the corresponding image at a time, which is comparable to juggling with one ball.
Asynchronous image acquisition
Asynchronous image acquisition is comparable to juggling with several balls: While you work with an image, the next image is being acquired. Simplified said: the more images within a given time you want to work with, the more buffers you have to handle.
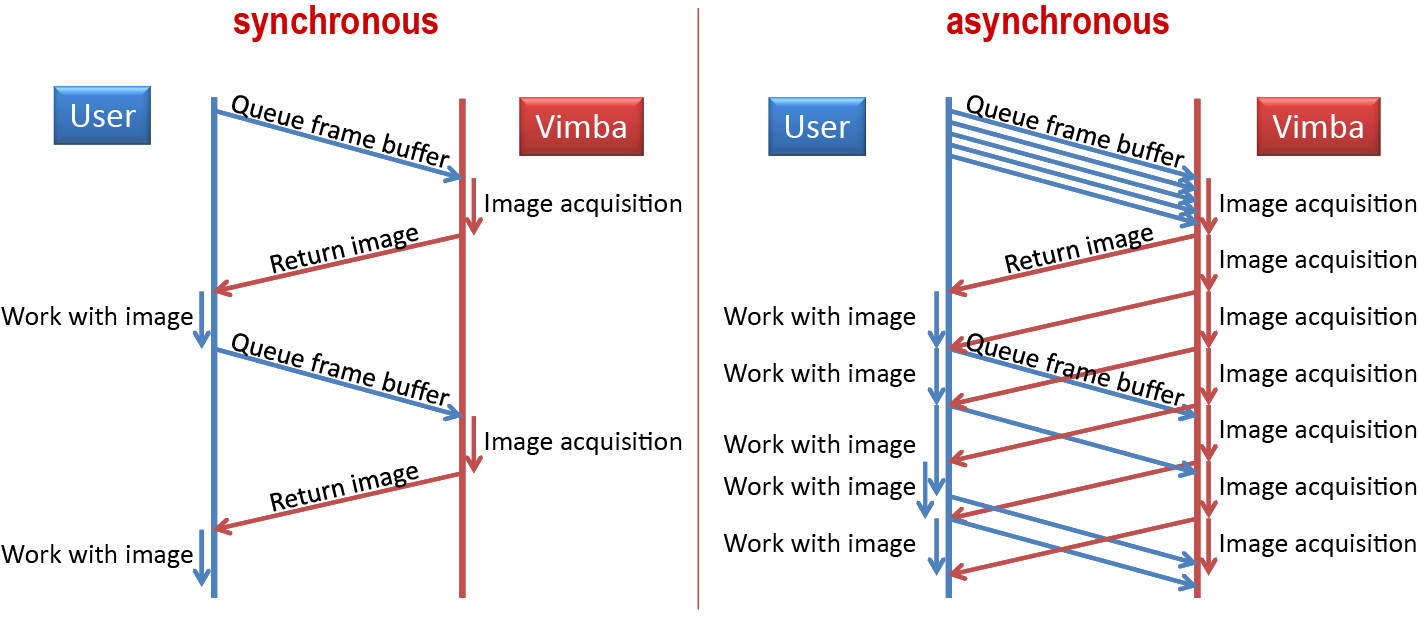
Synchounous and asynchronous image acquisition
Notifications
In general, a vision system consisting of cameras and PCs is asynchronous, which means that certain events usually occur unexpectedly. This includes - among others - the detection of cameras connected to the PC or the reception of images. A Vimba application can react on a particular event by registering a corresponding handler function at the API, which in return will be called when the event occurs. The exact method how to register an event handler depends on the programming language. For details, use the code examples.
Note
The registered functions are usually called from a different thread than the application. So extra care must be taken when accessing data shared between these threads (multithreading environment). Furthermore, the Vimba API might be blocked while the event handler is executed. Therefore, it is highly recommended to exit the event handler function as fast as possible.
Tip
Not all API functions may be called from the event handler function. For more details, see the API Manual for the programming language of your choice.
Building applications
Setting up VS for C and C++ projects
Note
This chapter applies to Windows only.
Tip
To ensure backward compatibility, Vimba examples are compatible with Visual Studio 10 and higher.
The easiest way to set up Visual Studio for C or C++ projects is using the property sheet Examples.props from the Vimba examples folder. The following description uses C++, but the principle can be applied to the C API as well. Users of the other APIs can use Visual Studio without any special preparations.
In Visual Studio, create a new project. Ignore the Application Wizard, just click Finish.
Insert the following code into YourProjectName.cpp.
#include "stdafx.h"
#include <iostream >
#include "VimbaCPP/Include/VimbaCPP.h"
using namespace AVT:: VmbAPI;
int _tmain(int argc , _TCHAR* argv [])
{
std::cout << "Hello Vimba" << std::endl;
VimbaSystem& sys = VimbaSystem :: GetInstance ();
VmbVersionInfo_t version;
if (VmbErrorSuccess == sys.QueryVersion(version ))
{
std::cout << "Version:" << version.major << "." << version.minor << std::endl;
}
getchar ();
return 0;
}
Open the Property Manager window. In most Visual Studio editions, you can find it by clicking View → Other Windows → Property Manager.
In the Property Manager window, select Add Existing Property Sheet:

Go to the VimbaCPP_Examples folder. Unless you have changed the folder location during the Vimba installation, it is located at: C:\Users\Public\Documents\Allied Vision\Vimba_x.x. You need at least the Examples.props file, which is located in the BuildVS2010 folder. You can add the other PROPS files later as needed.
Now Visual Studio is set up and you can debug the solution.
Vimba Class Generator
The Vimba Class Generator is a tool for easily creating classes for Vimba C++ and Vimba.NET APIs. The generated classes offer access functions for each found feature, depending on the type of the feature.
Note
After a camera firmware update, regenerate the files and merge the access functions for new features manually into your previously generated code by copy & paste.
Class Generator main window
To generate classes, carry out the following steps:
Select the camera for which you would like to generate code.
Choose the destination folder for the generated files.
Select the programming language.
Customize the code generation with several visible options and template files.
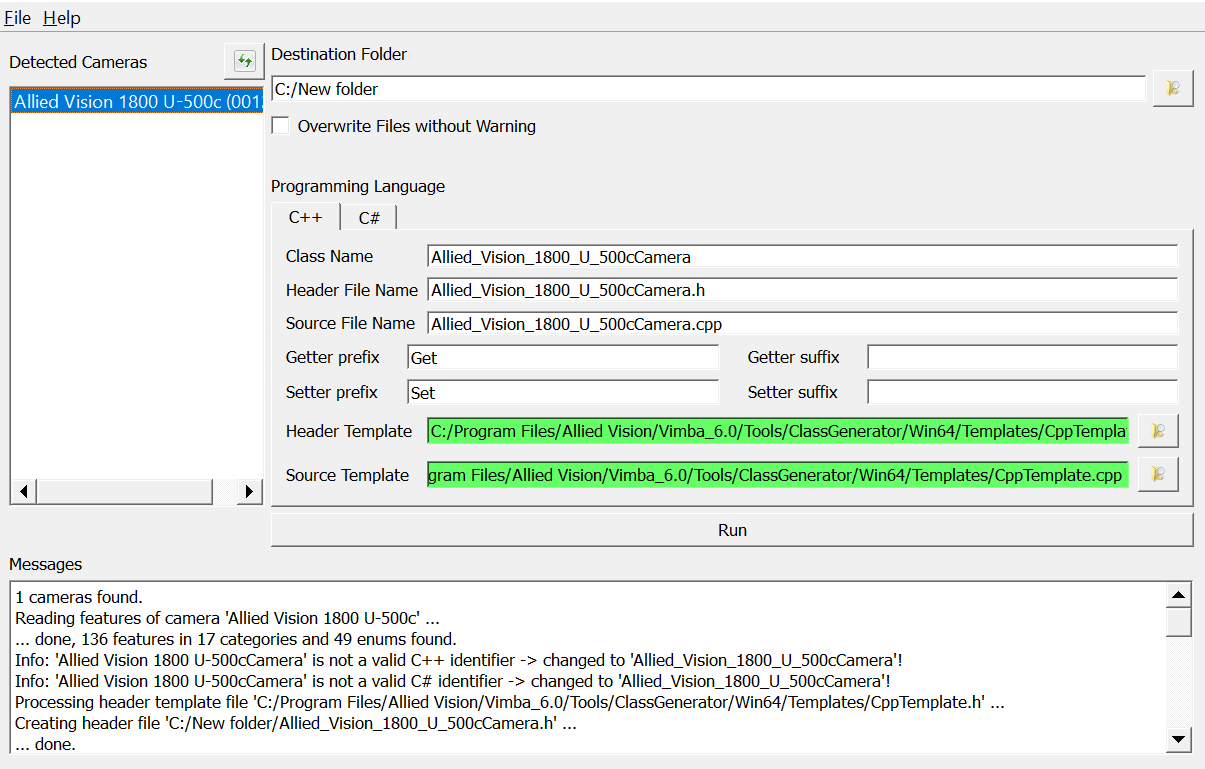
Class Generator
The cameras detected during the program startup are listed in the Detected cameras box. Select the camera for which you want to obtain code.
Tip
To detect new cameras, click the Refresh button.
To change the default destination folder, click the button beside the text field Destination Folder. Alternatively, enter a path manually.
By default, the Vimba Class Generator warns you before overwriting existing files. To change this behavior, select the checkbox Overwrite Files without Warning.
The options below Programming Language allow you to configure the code generation. To switch between programming languages, click the tab.
If everything is configured, Run is enabled. Click it to generate the code for the selected camera, programming language, and options.
The Messages text box informs you about activities of the Class Generator.
C++ code generation
In the C++ tab of the main window, you have the following options:
Class Name: The name of the generated class.
Header File Name: The name of the header file to create.
Source File Name: The name of the cpp file to create.
Getter prefix: The text that is inserted before the feature name for each getter function.
Getter suffix: The text that is added after the feature name for each getter function.
Setter prefix: The text that is inserted before the feature name for each setter function.
Setter suffix: The text that is added after the feature name for each setter function.
Header template: The file that is used as a template for generating the header file.
Source template: The file that is used as a template for generating the .cpp file.
Templates for the header file and the cpp file are available in a subfolder below the class generator program. A template file for the header file contains the following hashtags that serve as placeholders:
### HEADER_FILE_MACRO_NAME ###: Generated from the Header File Name in the main window.
### CLASS_NAME ###: Corresponds to Class Name in the main window.
### ENUM_DECLARATIONS ###: This is where the enum declarations are inserted.
### METHOD_DECLARATIONS ###: This is where the method declarations are inserted.
### VARIABLE_DECLARATIONS ###: This is where the variable declarations are inserted.
A template file for the cpp file may contain the following placeholders:
### HEADER_FILE_NAME ###: Corresponds to Header File Name in the main window.
### CLASS_NAME ###: Corresponds to Class Name in the main window.
### METHOD_IMPLEMENTATIONS ###: This is where the method implementations are inserted.
In the template file, you can change the order of the variables to generate files that better suit your requirements.
C# code generation
In the C tab of the main window, you have the following options:
Namespace: The namespace of the generated class.
Class Name: The name of the generated class.
Class File Name: The name of the class file to create.
Template File: The file that is used as a template for generating the class file.
A template for the source file to be generated is available in a subfolder below the class generator program. The template file may contain the following placeholders:
### NAMESPACE_NAME ###: Generated from the Namespace in the main window.
### CLASS_NAME ###: Corresponds to Class Name in the main window.
### PUBLIC_PROPERTIES ###: This is where the generated properties are inserted.
### PUBLIC_METHODS ###: This is where the generated methods are inserted.
### ENUM_DECLARATIONS ###: This is where the enum declarations are inserted.
In the template file, you can change the order of the variables to generate a file that better suits your requirements.
Vimba Firmware Updater
Vimba Firmware Updater supports firmware uploads to Allied Vision USB, MIPI, and Goldeye CL cameras. New firmware for each connected camera is automatically detected and selected. You can update several cameras in one step. Uploading older firmware to the camera is also possible. If you prefer to upload firmware via command line, see Command line Firmware Updater.
See also
Uploading firmware
To upload new firmware to your cameras, perform the following steps:
Connect your Allied Vision cameras and start Vimba Firmware Updater.
Click Open and select a firmware container file. Optional: Click Info to get details about the selected firmware.
Click Update cameras to upload the automatically selected firmware to your cameras.
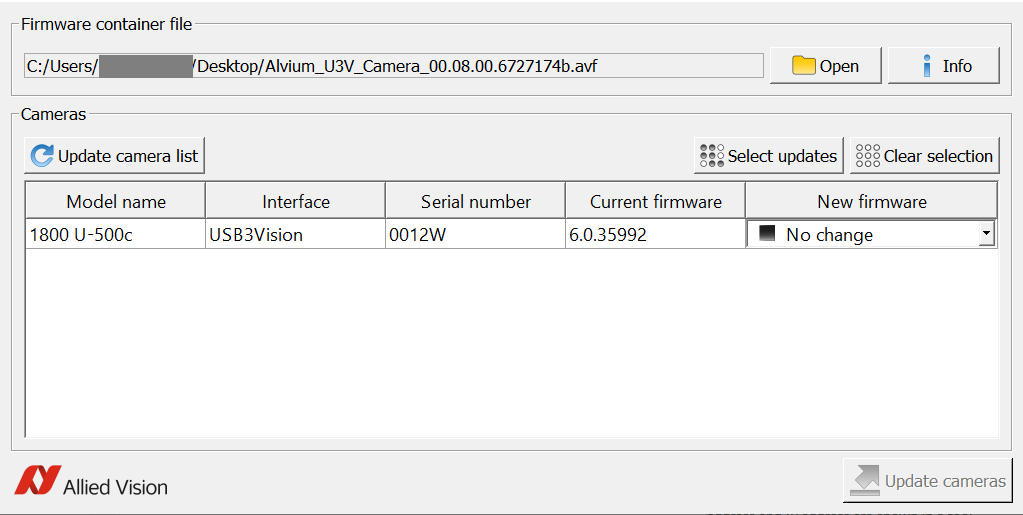
Firmware Updater
If the firmware has a lower version number, Vimba Firmware Updater interprets this as a older version and doesn’t update the firmware automatically.
To select the new firmware manually, go to the New firmware drop-down list.

Select firmware
Aborting a firmware upload
The firmware upload to several cameras takes some time. During the upload, Abort finishes the upload to the current camera, but does not upload firmware to the next models.
Troubleshooting
If your camera is not detected or the firmware cannot be updated:
Make sure no other application uses the camera.
Check if the camera works with Vimba Viewer.
Reboot the system.
Start the firmware upload again. If it does not work, start the command line Firmware Updater and use repair mode or contact our support team: https://www.alliedvision.com/support
Windows only: with USB cameras, start Vimba Driver Installer and make sure the Vimba USB driver is in use.
If you connected your USB camera to a hub, unplug the hub from the PC and disconnect its power supply. Reconnect it and try again.
Connect your USB camera to a different USB 3.0 input or a different hub.
Command line Firmware Updater
To update firmware via command line, use FWUpdaterConsole.exe. This tool provides two main functionalities:
--showor-sdisplays information about camera firmware or a firmware file.--writeor-wperforms the actual update.
See the following list of use cases:
Use case |
Parameters |
|---|---|
Show device info for list of cameras |
--show --device “list of ids” |
Show a list of matching firmware sets |
--show --container “file” --device all |
Show detailed info about matching |
--show --container “file” --device “id” |
Show firmware set info for one set |
--show --container “file” --index “index” |
Show firmware set info for list of sets |
--show --container “file” --index |
Show firmware set info for whole container |
--show --container “file” |
Write one firmware set to one camera |
--write --container “file” --device |
Write ‘best’ (latest) firmware set to list |
--write --container “file” --device |
Write ‘best’ (latest) firmware set to |
--write --container “file” --device all |
Write one firmware set to one camera |
--write --repair --container “file” |
The following options may be added to the “show” or ” the “write” functionality:
Option |
Parameters |
Show full information |
--verbose, -v |
Force writing |
--force, -f |
Repair device firmware during write |
--repair, -r |
Tip
By calling FWUpdaterConsole --help [command/option], you get more details
about the tool or its parameters.
Vimba Deployment
Modules
You can use the Vimba setup executable to manually install the software on the target machine or run the installer silently. The required Microsoft Installer (MSI) files are contained in the setup executable, it is not necessary to download them separately. To extract the MSIs from the setup executable, run:
Vimba.exe /extract.
Please note that this command will neither install anything nor will it affect a current installation on the machine. After selecting the destination folder, the following MSI files are created:
VimbaGigETL_Win32.msi
VimbaGigETL_Win64.msi
VimbaUSBTL_Win32.msi
VimbaUSBTL_Win64.msi
Vimba1394TL_Win32.msi
Vimba1394TL_Win64.msi
VimbaCLConfigTL_Win32.msi
VimbaCLConfigTL_Win64.msi
Vimba_Win32.msi
Vimba_Win64.msi
If you want to install Vimba for an application using the GenICam Transport Layer interface, it is sufficient to install one or more Vimba transport layer modules. If your application uses one of the Vimba APIs, it is necessary to additionally install Vimba.
Note
To install the Python API, follow the instructions in the Python API Manual.
Examples
Microsoft provides a tool named msiexec to install an MSI file. To install Vimba’s core components into the default programs folder, apply the following command lines:
#Install the Vimba GigE Transport Layer module:
msiexec -i VimbaGigETL_Win32.msi
ADDLOCAL="VCRedist100,GigETL_RegisterGenICamPathVariable,GigETL_Core"

#Install the Vimba USB Transport Layer module:
msiexec -i VimbaUSBTL_Win32.msi
ADDLOCAL="VCRedist100,USBTL_RegisterGenICamPathVariable,USBTL_Core"

#Install the Vimba 1394 Transport Layer module:
msiexec -i Vimba1394TL_Win32.msi
ADDLOCAL="VCRedist100,FireWireTL_RegisterGenICamPathVariable,FireWireTL_Core"

#Install the Vimba CL Config Transport Layer module:
msiexec -i VimbaCLConfigTL_Win32.msi
ADDLOCAL="VCRedist100,CLConfigTL_RegisterGenICamPathVariable,CLConfigTL_Core"

#The installation of Vimba depends on the API. Install the Vimba C API:
msiexec -i Vimba_Win32.msi ADDLOCAL="VCRedist90,VCRedist100,
VCRedist100_MFC,Vimba_Core,VimbaC_Core,VimbaImageTransform_Core,Vimba_DrvInst"

#Install the Vimba C++ API:
msiexec -i Vimba_Win32.msi ADDLOCAL="VCRedist90,VCRedist100,
VCRedist100_MFC,Vimba_Core,VimbaCPP_Core,AvtImageTransform_Core,Vimba_DrvInst"

#Install the Vimba .NET API:
msiexec -i Vimba_Win32.msi ADDLOCAL="VCRedist90,VCRedist100,
VCRedist100_MFC,Vimba_Core,VimbaNET_Core,VimbaImageTransform_Core,Vimba_DrvInst"
Other useful parameters for msiexec: INSTALLDIR=”path to desired installation directory” ALLUSERS=”1” Performs a machine-wide installation. If omitted, a per user installation is performed.
Note
The installation of the Vimba Transport Layer modules does not automatically install the corresponding hardware drivers.
Note
The installation of the Camera Link Config Transport Layer module automatically installs the Clallserial.dll.
Compiling the Vimba C++ API
If C++ API development components are installed, the Vimba C++ API source code along with Microsoft Visual Studio solution files for version 2005, 2008, and 2010 can be found in the examples folder, sub-folder: VimbaCPP_Source.
With the installed components:
You can find an example of using the C API
You may build your own C++ library with a different compiler
You can build a customized C++ API with your own shared pointer implementation. For more information on how to use shared pointers in the API, refer to the CPP API Manual.
Note
Please note that Allied Vision can offer only limited support if an application uses a modified version of the Vimba C++ API.